Wednesday, July 27, 2011
Wednesday, July 20, 2011
New Nikkor Micro Lens
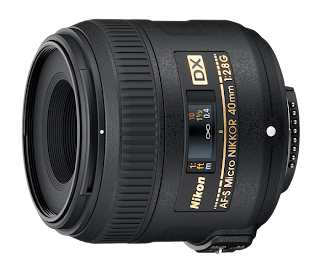
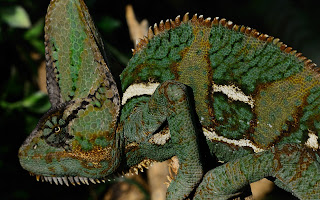
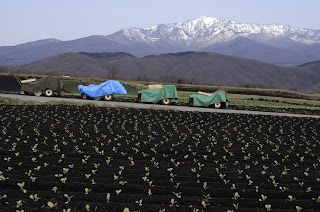
Nikon is just about set to launch its newest closeup macro lens - the AF-S DX Micro-Nikkor 40mm f/2.8G! This impressive lens is versatile enough to be used for closeup work such as macro shots of plants or food, portraits or even landscape work.


Specifications
Mount Type - Nikon F-Bayonet
Focal Length - 40mm
Maximum Aperture - f/2.8
Minimum Aperture - f/22
Format - DX
Maximum Angle of View (DX-format) - 38°50'
Maximum Reproduction Ratio - 1.0x
Lens Elements - 9
Lens Groups - 7
Compatible Format(s) - DX
Diaphragm Blades - 7
Distance Information - Yes
Super Integrated Coating - Yes
Autofocus - Yes
AF-S (Silent Wave Motor) - Yes
Minimum Focus Distance - .53ft.(0.163m)
Focus Mode - Auto, Manual, Manual/Auto
G-type - Yes
Filter Size - 52mm
Accepts Filter Type - Screw-on
Dimensions - (Approx.)2.7x2.5 in. (Diameter x Length); 68.5x64.5mm (Diameter x Length)Weight - (Approx.)9.9 oz. (280g)
Supplied Accessories - LC-52 52mm Snap-on Front Lens Cap, LF-4 Rear Lens Cap, HB-61 Bayonet Hood, CL-0915 Flexible Lens Pouch
Keep watch for more announcements about this great new Nikkor lens!
Tuesday, July 19, 2011
Sunday, July 17, 2011
Light Writing
Having gotten through the 4th of July, we always have sparklers left over. Use those left over sparkers to do some light writing.
Here's how to set up you camera.
Always use a tripod! This is a must...
Set your camera mode to M (Manual) this is the best way to set your camera up perfectly.
Set f/5.6 to f/11 this will let less light hit the sensor and make you have a longer shutter speed.
Set shutter speed to 4 seconds to 8 seconds (just about 1 second for every letter in your word)
| Source |
Always use a tripod! This is a must...
Set your camera mode to M (Manual) this is the best way to set your camera up perfectly.
Set f/5.6 to f/11 this will let less light hit the sensor and make you have a longer shutter speed.
Set shutter speed to 4 seconds to 8 seconds (just about 1 second for every letter in your word)
Try the Tungsten white balance, remeber your camera has a monochrome that will shoot it in black & white too!
Here is the key.... Make sure everyone writes their letters backwards!
Here is the key.... Make sure everyone writes their letters backwards!
Review & enjoy!
| Source |
Friday, July 8, 2011
Used Nikon Clearance
All the USED Nikon Equipment in our Honolulu Location is 10% off for 3 days only. Check out the selection on our website http://www.lighthauscamera.com/ or call our Honolulu location at 808-955-5155. Order now and pick up at any of our locations.
Friday, July 1, 2011
Fireworks
10 Tips to Better Fireworks Photos
#1 Use a tripod, its a must! We as photographers forget how much a tripod can change our images. Forget steady hands and concentration let the tripod do all the work. And for a dramatic feel sit on the ground and bring you tripod lower and point your lens up at the night sky. This can change your perspective dramatically! And don’t forget, turn off your flash.
#2 Use a remote release. This may seem obvious but you would not believe how many shooters forget this small and simple gadget. There are many different types of releases, wireless, corded ones (these allow you to do exposures of 30 seconds or longer) and even digital corded releases. Also don’t forget that even the mirror swinging up and down in your camera can cause the tiniest blur. Try using the mirror lock up option!
#3 ISO. What ISO should you use? Well when doing these types of shots digital noise can be very distracting. The lower ISOs will make your blacks inky black and your colors truly vivid. So start at 100 and try to keep your shutter speeds at a reasonable length( 3-30 seconds). If you find that your shutter is open far too long try a higher ISO till you get the desired effect.
#4 Shutter Speeds. This is where intuition and knowledge come together. Every 4th of July display is different. This is where the bulb option comes in. You can listen for the explosion then hold down the shutter button on your corded remote the release 3-8 seconds later. If this is too loose experiment with different shutter speeds till you get your desired effect. Be care full as shutter speeds too long will quickly get overexposed.
#5 Aperture. All photographers will intuitively reach for their fast lenses so they can fire of shots at f/2.8. Let’s not forget that we have a tripod and some of these explosions are GIANT and have serious depth of field. So a smaller aperture is more rewarding, try a f/8 to f/16. Get ALL of the display in focus at the same time.
#6 Manual Mode. Don’t be scared! Full manual will give you all the tools to change the outcome of your photos! Don’t hesitate to try different shutter speeds and apertures to make a truly dynamic photo.
#7 Lens Selection. I would always suggest you use your favorite lens. That way you are familiar (it will be dark while you are taking your photos). Remember longer focal lengths are going to make it harder to focus and frame. Wider angles may give the image context as to the surroundings of the area.
#8 Framing and Composition. Scope out your location early. You don’t want to be setting up your tripod in the dark! Look at how you may want to frame your images. Do you prefer verticals? Do you love wider angles? Do you have folks sitting in front of you creating a nice silhouette? Don’t forget that the reactions around you may be a portion of why the 4th is so fun!
#9 Experiment! Try new things, like zooming your lens while the shutter is up. Play with blur. If you are shooting digital you will get to see right away if you got something you like. Remember what you did to get certain effects. (I have a small pencil, notepad, and flashlight combo in my camera bag to write down interesting discoveries. )
#10 Grand Finale. All displays have a grand finale. If you are not getting what you want stop, slow down, regroup, and prep for the grand finale.
Lighthaus Camera has all the tools you need to get the best photos this Independence Day Celebration. We have a great selection of tripods, remotes, and lenses. As always we are passionate about photography and want to help you get the best shot!
#1 Use a tripod, its a must! We as photographers forget how much a tripod can change our images. Forget steady hands and concentration let the tripod do all the work. And for a dramatic feel sit on the ground and bring you tripod lower and point your lens up at the night sky. This can change your perspective dramatically! And don’t forget, turn off your flash.
#2 Use a remote release. This may seem obvious but you would not believe how many shooters forget this small and simple gadget. There are many different types of releases, wireless, corded ones (these allow you to do exposures of 30 seconds or longer) and even digital corded releases. Also don’t forget that even the mirror swinging up and down in your camera can cause the tiniest blur. Try using the mirror lock up option!
#3 ISO. What ISO should you use? Well when doing these types of shots digital noise can be very distracting. The lower ISOs will make your blacks inky black and your colors truly vivid. So start at 100 and try to keep your shutter speeds at a reasonable length( 3-30 seconds). If you find that your shutter is open far too long try a higher ISO till you get the desired effect.
#4 Shutter Speeds. This is where intuition and knowledge come together. Every 4th of July display is different. This is where the bulb option comes in. You can listen for the explosion then hold down the shutter button on your corded remote the release 3-8 seconds later. If this is too loose experiment with different shutter speeds till you get your desired effect. Be care full as shutter speeds too long will quickly get overexposed.
#6 Manual Mode. Don’t be scared! Full manual will give you all the tools to change the outcome of your photos! Don’t hesitate to try different shutter speeds and apertures to make a truly dynamic photo.
#7 Lens Selection. I would always suggest you use your favorite lens. That way you are familiar (it will be dark while you are taking your photos). Remember longer focal lengths are going to make it harder to focus and frame. Wider angles may give the image context as to the surroundings of the area.
#9 Experiment! Try new things, like zooming your lens while the shutter is up. Play with blur. If you are shooting digital you will get to see right away if you got something you like. Remember what you did to get certain effects. (I have a small pencil, notepad, and flashlight combo in my camera bag to write down interesting discoveries. )
#10 Grand Finale. All displays have a grand finale. If you are not getting what you want stop, slow down, regroup, and prep for the grand finale.
Lighthaus Camera has all the tools you need to get the best photos this Independence Day Celebration. We have a great selection of tripods, remotes, and lenses. As always we are passionate about photography and want to help you get the best shot!
Friday, June 24, 2011
Relational Exposure Techniques
While it may seem confusing at first, the aperture and shutter speed controls on your camera operate in a synchronized and organized way when their relationship is understood. These controls allow you to preconceive the image you would like to create and then execute it, whether you’re shooting a digital, or a film camera. Each major F-stop and Shutter Speed allows exactly either one half or twice the amount light to enter your lens as the one next to it.
Shutter Speeds
Consider these shutter speeds which determine how long the shutter of the camera is open.
500 ~ 250 ~ 125 ~ 60 ~ 30 ~ 15 ~ 8 ~ 4
Keep in mind that 500 is actually 1/500 of a sec, so 1/250 is double the exposure time and same with the rest of these speeds. Moving from left to right, each of these shutter speeds is exactly double the exposure time of the previous one.
F-Stops
The F-stops control the diameter or size of the lens opening.
F2.8 ~ f4 ~ f5.6 ~ f8 ~ f11 ~ f16 ~ f22 ~ f32
Some confusion may arise since the f-stops while not numerically symmetrical; they also allow exactly either one half or twice the light to enter through your lens as the one next to it. Moving for left to right on the above scale each F-stop allows one half the amount of light to enter the camera as the previous one.
Since each of these controls represents either one half or double of the one next to it, they can be used in different combinations to produce the same amount of light or exposure entering the camera. Consider these exposure combinations stated as a thirtieth at f2.8 (first one).
30 @ f2.8 ~ 15 @ f4 ~ 8 @ f5.6 ~ 4 @ f8 ~ 2 @ f11
While the aperture opening and shutter speed vary considerably, all of these combinations result in the same exposure level. The correct exposure amount will be determined by the metering system in your camera.
The creative aspect mentioned earlier comes in play by understanding how the various F-Stops and Shutter Speeds affect your image. The F-Stops control depth of field as explained in our recent blog post about apertures. The Shutter Speeds will affect your image by either freezing or blurring the image. A fast Shutter Speed such as 1/500 will freeze a race car or a galloping horse, while a slower speed such as 1/15 will create a sense of motion as the subject is moving faster than the shutter takes to complete its cycle. Practicing with your camera and tracking your results will allow you to begin building an understanding of how your Shutter Speed and F-Stop settings will affect the outcome of your image.
Friday, June 17, 2011
It's Good To Be Shallow
Well, when it comes to photography, it can be.
Among the many aspects of taking a photo, your f-stop or aperture can be one of the most confusing. In the simplest terms, the aperture controls how much light enters the camera. The larger your aperture, the more light enters the camera. The smaller it is, the less light it gets. Simple enough, right? Sure. As long as you don't get deeper into it. But we are.
The aperture size is represented by a number, or f-stop. You'll hear numbers like f/2.8, f/3.5, f/11 and so forth. But here's where things get confusing; the smaller the f-number, the larger your aperture will be, and the larger the f-number, the smaller the aperture will be.
This is an example of three aperture sizes. At f/2 your aperture is wide open, allowing for a ton of light to enter the camera. At f/22 the aperture is closed down and you have much less light coming into the camera. What this means to you is that if your aperture is larger, since more light is coming in you can use a faster shutter speed. If your aperture is smaller, then you're going to need to use a slower shutter speed to compensate for the lack of light.
Your aperture size will also determine your image's depth of field. Simply put, "depth of field" refers to how wide (deep) or narrow (shallow) your focus is. An image with a wide depth of field will have a clearer focus on objects further away from your subject, and a narrow depth of field will have less focus on anything further from your subject. Take a look at the image bellow. If you roll your mouse cursor over the different apertures below, you'll see exactly what all that means.
 At f/1.4, your aperture is wide, wide open. That means more light, and less depth of field. So the trees and buildings behind the subject become very blurry. At f/22, the aperture is smaller which equates to less light but far more depth - everything behind the subject is much clearer. Knowing how aperture sizes affect your depth of field can really change the impact of your image.
As stated, at f/22 there is a lot more focus in the overall image which can create a background that is very busy, or visually confusing. Your focus isn't necessarily drawn immediately to the subject - which you may or may not want depending on the feel you're looking to capture in your image. With a shallower depth of field, the viewer's eyes are pulled right to your subject, but having your focus extremely narrow means parts of your subject could get blurred out as well. Again, it all depends on what look you want for your final image. Generally speaking, when taking portraits or product shots, having a shallow depth of field is recommended.
Among the many aspects of taking a photo, your f-stop or aperture can be one of the most confusing. In the simplest terms, the aperture controls how much light enters the camera. The larger your aperture, the more light enters the camera. The smaller it is, the less light it gets. Simple enough, right? Sure. As long as you don't get deeper into it. But we are.
The aperture size is represented by a number, or f-stop. You'll hear numbers like f/2.8, f/3.5, f/11 and so forth. But here's where things get confusing; the smaller the f-number, the larger your aperture will be, and the larger the f-number, the smaller the aperture will be.
This is an example of three aperture sizes. At f/2 your aperture is wide open, allowing for a ton of light to enter the camera. At f/22 the aperture is closed down and you have much less light coming into the camera. What this means to you is that if your aperture is larger, since more light is coming in you can use a faster shutter speed. If your aperture is smaller, then you're going to need to use a slower shutter speed to compensate for the lack of light.
Your aperture size will also determine your image's depth of field. Simply put, "depth of field" refers to how wide (deep) or narrow (shallow) your focus is. An image with a wide depth of field will have a clearer focus on objects further away from your subject, and a narrow depth of field will have less focus on anything further from your subject. Take a look at the image bellow. If you roll your mouse cursor over the different apertures below, you'll see exactly what all that means.

As stated, at f/22 there is a lot more focus in the overall image which can create a background that is very busy, or visually confusing. Your focus isn't necessarily drawn immediately to the subject - which you may or may not want depending on the feel you're looking to capture in your image. With a shallower depth of field, the viewer's eyes are pulled right to your subject, but having your focus extremely narrow means parts of your subject could get blurred out as well. Again, it all depends on what look you want for your final image. Generally speaking, when taking portraits or product shots, having a shallow depth of field is recommended.
Subscribe to:
Comments (Atom)


